教程:在Apple Final Cut Pro X中最大化亮度和对比度
直方图和波形在Apple Final Cut Pro X是有效的, 易于掌握的工具,提供清晰的输入,你需要诊断和解决对比度问题,在你的视频简单和智能. 在这个视频教程中,视频编辑和编码专家Jan Ozer解释了它们是如何工作的.
在本教程中,您将学习如何在Apple Final Cut Pro X中最大化视频的亮度和对比度. 我正在研究我最近拍摄的当地国会候选人的视频 Anthony Flaccavento. I shot the speech indoors under fluorescent lights. Although the color balance is fine, it lacks contrast and it's pretty noisy, as you can see in the video above. We'll deal with the noise issue in a later tutorial.
Using the Luma Histogram for Brightness
对比度的一个定义是图像中最亮和最暗像素之间的差异. And you can see that most clearly in the histogram scope. We'll begin by opening that. To do so in FCP X, choose Window > Show Video Scopes (Figure 1, below).
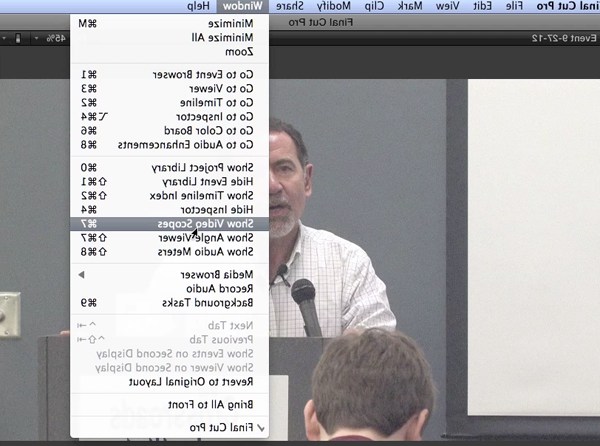
Figure 2 (below) 显示我们已经设置直方图来表示Luma通道,这是亮度的度量.

Specifically, 直方图显示了像素根据亮度的分布, from a scale of -25 to +125, with 0 as pure black, and 100 as pure white. 您在图2(上面)中看到的团块显示了这些亮度值下的像素组.
In a well-lit, 纯白色和纯黑色区域对比良好的视频, like this one, 您希望看到从0到100的所有亮度值的像素. 在这个视频中,我们知道我们有问题,因为帧中有大量的黑色(Figure 3, below), 但是直方图显示在0 IRE级别没有像素(图3), below), which is where the black pixels should sit. So, this tells us that the image lacks contrast.
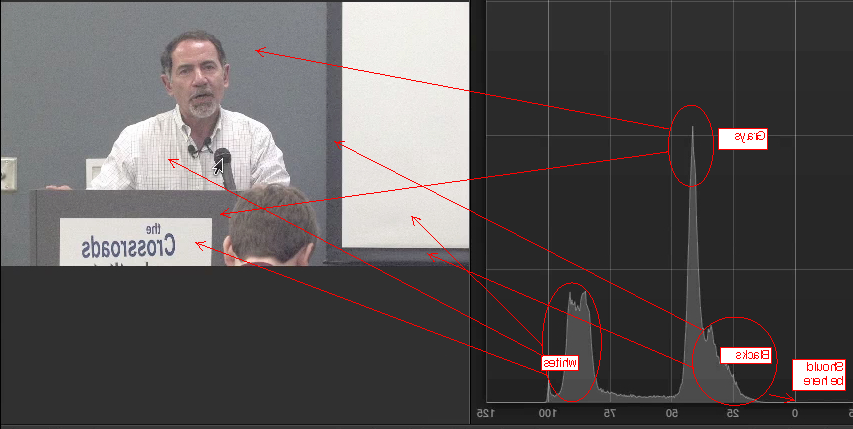
Figure 3 (above) shows the grays, blacks, and whites in the image, and where they appear in the histogram. Under optimal lighting, whites should be around 100 IRE; but most are clustered in the 80s. 所以,我们看到白色像素的亮度有问题,就像黑色像素一样.
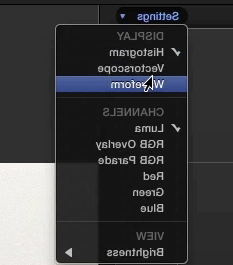
调整对比度时要考虑的第三个区域是脸部, but the histogram really doesn't help us with that. When adjusting brightness in the face, it's best to work in the waveform monitor (Settings > Display > Waveform, as shown in Figure 4, below).
Working with the Waveform
波形显示了与直方图相同的基本亮度信息, 但是在帧中各自的位置显示像素. So, if you look at the pixels circled on the left in Figure 5 (below) you know they correspond to the whiteboard in the image. 在波形中,它们右边的像素与图像中白板右边缘的黑线相关. 波形中间的棕色像素是候选人的脸.
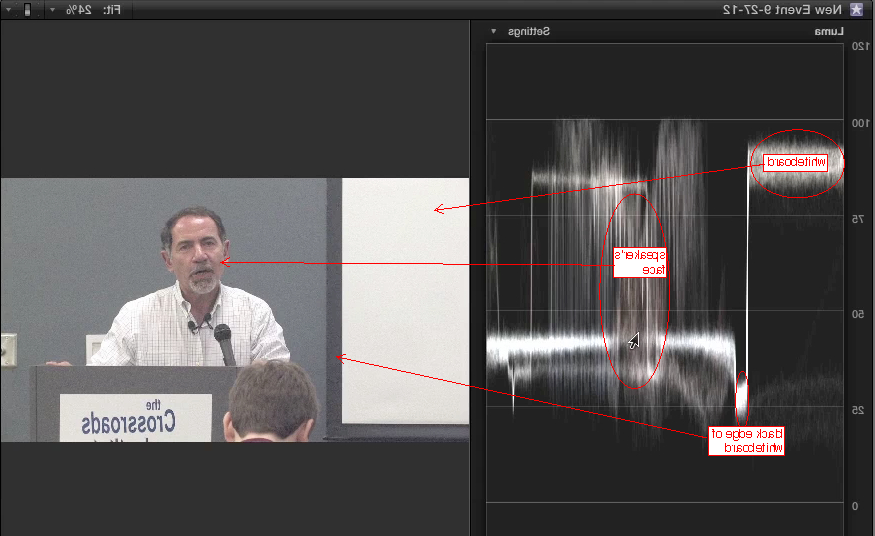
Now, typically when you're shooting with your zebra stripes, 在最亮的区域,你需要面部曝光在70-75 IRE左右. 在图5(上面)中,您可以看到我们可能在60 IRE左右,所以我想提高它. Overall, when adjusting this video, 我想让这些白色在左边(对应于白板)在100, the blacks at 0, and the facial regions to be in the 70-75 range.
Related Articles
In this first installment of our new tutorial series, Glen Elliott demystifies Final Cut Pro X, illustrates its core functions, 并专注于最强大的组织新功能之一, accelerating, and streamlining your edits: metadata keyword tagging.
背景噪音和弹出和点击音频是一个不幸的事实,许多产品的生活. 在本教程中,我们将探索一些修复,你可以尝试在Final Cut Pro X.
Jan Ozer坐下来与Bill Roberts讨论影响视频专业人士Adobe Creative Suite未来方向的趋势, including the decline of 3D, the rise of 4K, and second-screen viewing. 其他话题包括Creative Cloud的发展,以及Apple Final Cut Pro X的发展轨迹.
In this tutorial, Jan Ozer演示了如何使用Neat Video插件从视频中去除噪声, improving output quality for all outputs.
在本教程中,您将学习如何在Adobe Premiere Pro CS6中使用亮度最大化视频的亮度和对比度, Contrast, 和伽马校正控制有效和平衡的调整.
No matter how fast, efficient, and determined a 48 Hour Film Project production team is, they need to finish strong with a streamlined edit. Final.修订编辑斯科特·斯特林普描述了苹果Final Cut Pro X是如何让他在最后期限前交付产品的, by leveraging key features that could make any edit cook.
When Apple originally released Final Cut Pro 10, the biggest deficit for Pro users was the lack of multicam. With the 10.0.3 release, 苹果公司已经解决了这个问题,具有高功能和易于使用的多摄像机功能, which Jan Ozer explains in this tutorial.